How to use Windows LAPS to secure local administrator accounts
Windows Local Administrator Password Solution (Windows LAPS) is a new feature that was introduced in the April 11, 2023 update for Windows. It allows you to manage and rotate the password of a local administrator account on your Windows devices and store the password securely in Microsoft Entra ID or Active Directory. This can help you prevent Pass-the-Hash and lateral movement attacks that exploit weak or shared local administrator passwords.
In this blog post, I will show you how to set up and use Windows LAPS in your environment, and how to migrate from the legacy LAPS product if you are already using it.
Prerequisites
To use Windows LAPS, you need the following:
- Devices must be Entra ID joined or Hybrid Entra ID joined.
- Devices must be managed by Intune.
- Devices must have the April 11, 2023, or later Windows Updates installed
- Devices must have the Intune Management Extension installed.
- Devices must be online and able to communicate with Intune.
- You must have a Microsoft Entra ID role that has the permission to retrieve local administrator passwords.
- Microsoft Intune Plan 1 License
What is the new Windows LAPS?
The new Windows LAPS is an improvement over the legacy LAPS product that was available on the Microsoft Download Center. The new Windows LAPS offers the following benefits:
- It is ready to go out-of-the-box, without requiring any external installation or configuration.
- It supports both Microsoft Entra joined and Microsoft Entra hybrid joined devices and allows you to back up your local administrator passwords to Microsoft Entra ID or Active Directory.
- It allows you to manage your local administrator account settings, such as password age, length, complexity, and manual password reset, using Microsoft Intune policies.
- It allows you to retrieve and rotate your local administrator passwords on demand, using the Microsoft Entra or Microsoft Intune portal, or the Microsoft Graph API.
- It allows you to create role-based access control (RBAC) policies with custom roles and administrative units for authorizing password recovery.
- It allows you to view audit logs and monitor password update and retrieval events.
- It allows you to configure conditional access policies on directory roles that have the authorization of password recovery.
Setting up Windows LAPS
To set up Windows LAPS, you need to do different things depending on your environment and requirements. I will list three common scenarios:
To enable Windows LAPS with built in Administrator on Microsoft Entra ID Hybrid Joined devices.
- Create a Client-Side Policy to configure LAPS using Built in Administrator.
- Create a Client-Side Policy to configure the local Built in Administrator account to be enabled.
To enable Windows LAPS with built in Administrator on Microsoft Entra ID Joined devices and Microsoft Entra ID Hybrid Joined devices.
- Configure a Tenant-wide setting to enable Windows LAPS for Microsoft Entra Joined devices.
- Create a Client-Side Policy to configure LAPS using the Built in administrator.
- Create a Client-Side Policy to configure the local Built in Administrator account to be enabled.
To enable Windows LAPS with custom Administrator on Microsoft Entra ID Joined devices and Microsoft Entra ID Hybrid Joined devices.
- Configure a Tenant-wide setting to enable Windows LAPS for Microsoft Entra Joined devices.
- Create a Client-Side Policy to configure LAPS using the custom administrator.
- Create a Client-Side Remediation to create a custom Administrator account.
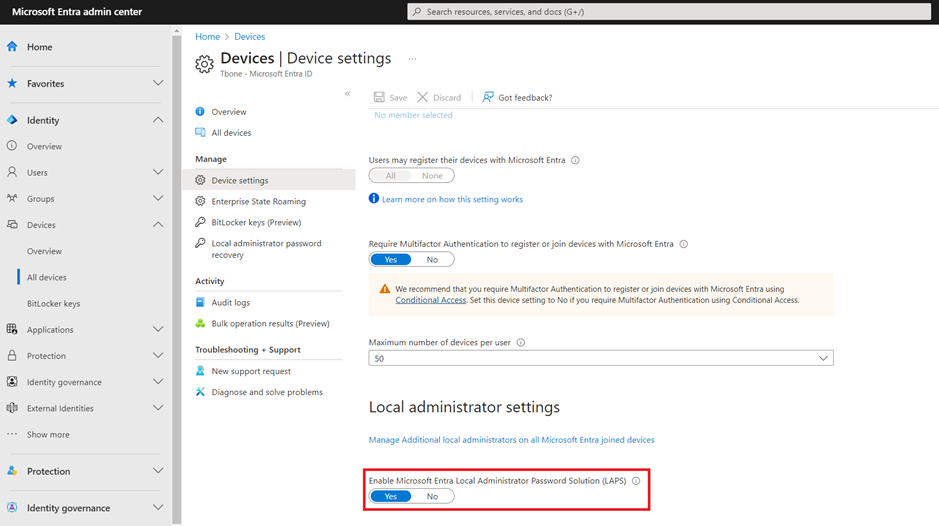
Configure a Tenant-wide setting to enable Windows LAPS for Microsoft Entra Joined devices
To enable Windows LAPS to support Microsoft Entra Joined devices in your tenant, follow these steps:
Note: To enable Windows LAPS to support Microsoft Entra Hybrid Joined devices in your tenant, you do not need to enable the Tenant wide setting in Entra.
- Sign in to the Entra admin portal https://entra.microsoft.com
- Go to Identity > Devices > Overview.
- Select Device Settings
- Set Enable Microsoft Entra Local Administrator Password Solution (LAPS) to Yes
Configuring the client-side policy
To configure the client-side settings for Windows LAPS, follow these steps:
- Sign into the Microsoft Intune Portal https://Intune.microsoft.com
- Go to Endpoint Security > Account Protection
- Click on +Create Policy
- Select Windows 10 and later as the platform and Local amin password solution (Windows Laps) as the profile type.
- Give the profile a name and a description and click Next.
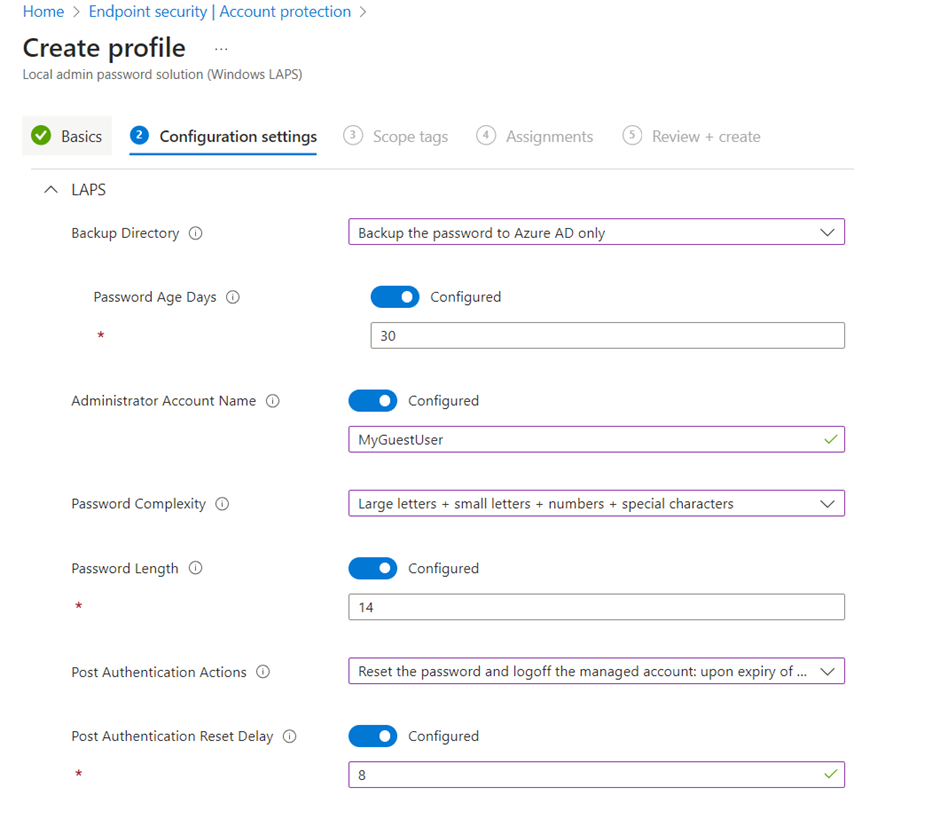
- On Configuration settings:
- Backup Directory: Where to store the Passwords. I recommend Microsoft Entra (Azure AD), this model support both Microsoft Entra Joined and Hybrid Joined devices.
- Password Age Days: 30 days is default and is ok when using Post Authentication Actions.
- Administrator Account Name: If not selected the local administrator account with a well-known SID will be used. In my opinion it is better to create and use another account with an unknown SID.
Note: You need to create that account with another policy, Windows LAPS will not create it. - Password Complexity: Of course, you select the most complex. The downside is the user friendliness for Helpdesk when they will use it. But in this case, I select security in front of usability.
- Password Length: Default is 14 and that is an OK password length. Many organizations now a days have 16 characters in their password policy, then this should reflect that policy.
- Post Authentication Actions: Here you can determine what will happen if the account is used for logon and the grace period expires. The default is to reset password and logoff. Sounds like a good idea!
- Post Authentication Reset Delay: The grace period from above. How long after the first login will the password reset and logoff the user. I recommend lowering the default value of 24h to a working day of 8 hours or lower.
- Click Next
- Select Scope tags if applicable and click Next.
- Assign the policy to your targets and click Next. I usually assign it to All Devices to make it globally enabled.
- Review and create the policy.
Option 1: Create a Client-Side Policy to configure the local Built in Administrator account to be enabled
- Sign into the Microsoft Intune Portal https://Intune.microsoft.com
- Go to Devices > Windows.
- Select Configuration Profiles
- Click + Create Profile
- Select Windows 10 and later as the platform and Settings Catalog as the profile type and click Create.
- Give the profile a name and a description and click Next.
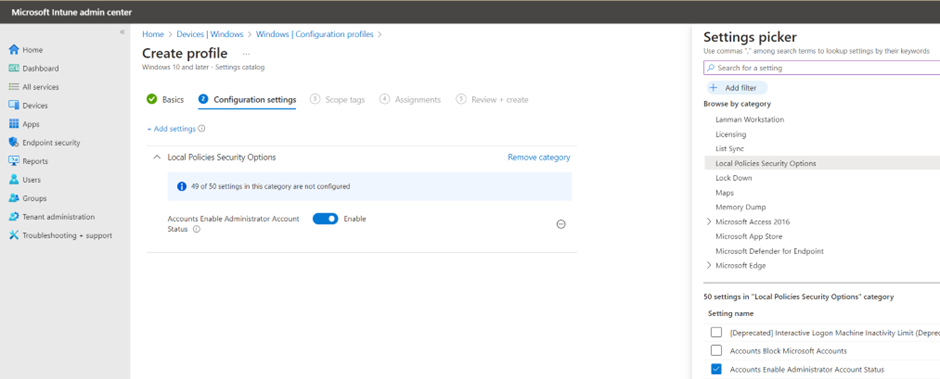
- On Configuration settings, click + Add settings.
- Navigate to Local Policies Security Options and select Accounts Enable Administrator Account Status.
- Set the configuration to Enable.
- Click Next.
- Select Scope tags if applicable and click Next.
- Assign the policy to your targets and click Next. I usually assign it to All Devices to make it globally enabled.
- Review and create the policy.
Option 2: Create a Client-Side Remediation to create a custom Administrator account
It is possible to create an account in some different ways. I prefer using Remediation. With Remediation you can set an unknown random password each time you create the account and avoid having that password in clear text in the configuration.
- Sign into the Microsoft Intune Portal https://Intune.microsoft.com
- Go to Devices > Windows.
- Select Scripts
- On the Remediation Tab, click + Create.
- Give the profile a name and a description and click Next.
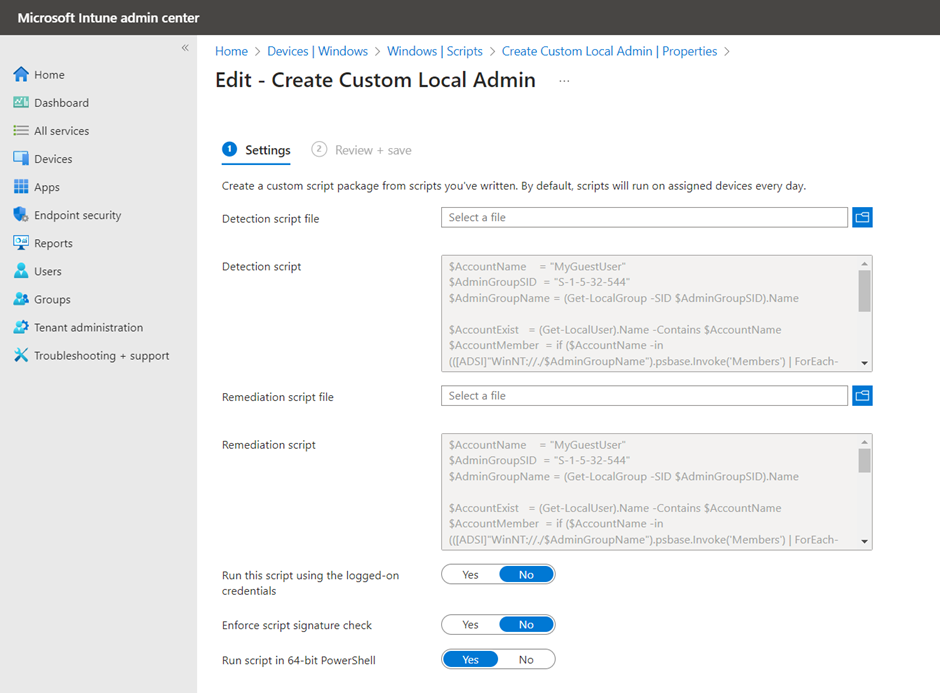
- Add a detection script that could look like this:
$AccountName    = "MyGuestUser"

$AdminGroupSID  = "S-1-5-32-544"

$AdminGroupName = (Get-LocalGroup -SID $AdminGroupSID).Name

$AccountExist   = (Get-LocalUser).Name -Contains $AccountName

$AccountMember  = if ($AccountName -in (([ADSI]"WinNT://./$AdminGroupName").psbase.Invoke('Members') | ForEach-Object {$_.GetType().InvokeMember("Name","GetProperty",$Null,$_,$Null)})){$true}else{$false}

if ($AccountExist -and $AccountMember) {Exit 0}     #Account Exist and is a member

Elseif ($AccountExist -and !$AccountMember){Exit 1} #Account exist but is not member

Else {Exit 1} #Account Missing- Add a remediation script that could look like this:
$AccountName    = "MyGuestUser"

$AdminGroupSID  = "S-1-5-32-544"

$AdminGroupName = (Get-LocalGroup -SID $AdminGroupSID).Name

$AccountExist   = (Get-LocalUser).Name -Contains $AccountName

$AccountMember  = if ($AccountName -in (([ADSI]"WinNT://./$AdminGroupName").psbase.Invoke('Members') | ForEach-Object {$_.GetType().InvokeMember("Name","GetProperty",$Null,$_,$Null)})){$true}else{$false}

if (!$AccountExist){

    $RandomPassword = ConvertTo-SecureString -String (-join ((33..126) | Get-Random -Count 32 | % {[char]$_})) -AsPlainText -Force

    New-LocalUser -Name $AccountName -Description "Custom local user account" -Password $RandomPassword}

if (!$AccountMember){Add-LocalGroupMember -SID $AdminGroupSID -Member $AccountName}

$AccountExist  = (Get-LocalUser).Name -Contains $AccountName

$AccountMember  = if ($AccountName -in (([ADSI]"WinNT://./$AdminGroupName").psbase.Invoke('Members') | ForEach-Object {$_.GetType().InvokeMember("Name","GetProperty",$Null,$_,$Null)})){$true}else{$false}

if ($AccountExist -and $AccountMember) {Exit 0}     #Remediation Successful

else {Exit 1} #Remediation Failed- Set the following additional parameters:
- Run this script using the logged-on credentials = No
- Enforce script signature check = No
- Run script in 64-bit PowerShell = Yes
- Click Next
- Give the profile a name and a description and click Next.
- Select Scope tags if applicable and click Next
- Assign the policy to your targets and click Next. I usually assign it to All Devices to make it globally enabled.
- Select Schedule to run Daily. It is not necessary to run more often.
- Review and create the remediation.
Using Windows LAPS
Once you have set up Windows LAPS, you can use it to retrieve and rotate local administrator passwords for your devices.
Admin Roles to Read Windows LAPS Password
The purpose of Windows LAPS is often to let Helpdesk be able to collect the LAPS password and remote help users with that account. But the permission to read passwords are connected to the following roles:
- Global Administrator
- Cloud Device Administrator
- Intune Administrator
But to limit this to a least privilege you should create a custom Helpdesk role in Microsoft Entra. The custom role must be assigned the permission:
microsoft.directory/deviceLocalCredentials/password/read
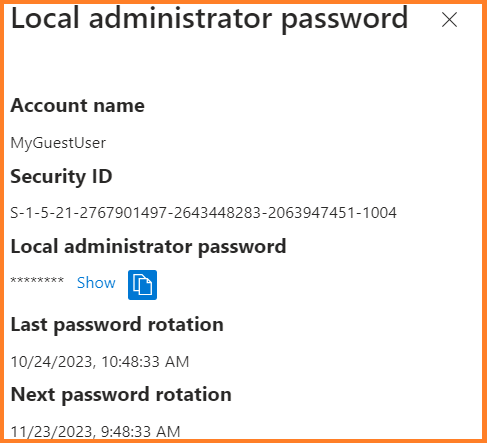
Retrieving local administrator passwords
To retrieve a local administrator password for a device, follow these steps:
- Sign into the Microsoft Intune Portal https://Intune.microsoft.com
- Go to Devices > Windows.
- Select Windows Devices
- Select the device that you want to access and click on its name.
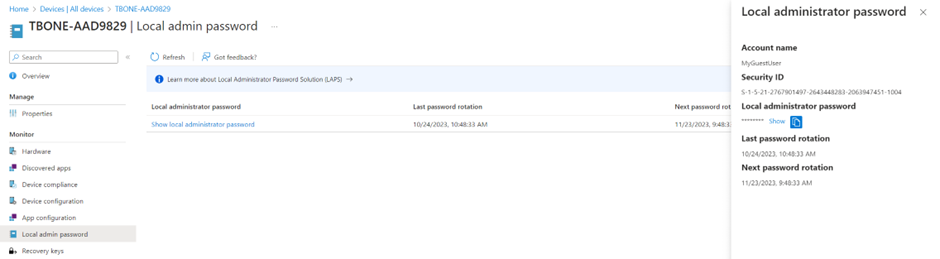
- On the device overview page, select the node Local Admin Password.
- You will now see the LAPS account general info. To get the password, click on the Show local administrator password.
- Now you can see the Account Name, Security ID, But the password is still not shown. You need to click Show to show the LAPS password.
Rotating local administrator passwords
To rotate a local administrator password for a device, follow these steps:
- Sign into the Microsoft Intune Portal https://Intune.microsoft.com
- Go to Devices > Windows.
- Select Windows Devices
- Select the device that you want to access and click on its name.
- On the device overview page, click on the three dots (…) on the action bar.
- Select Rotate Local Administrator Password
The old password will be invalidated, and you will need to use the new password to log in to the device as a local administrator.
Migrating from legacy LAPS
If you are already using the legacy LAPS product that is available on the Microsoft Download Center, you can migrate to Windows LAPS easily. Windows LAPS is compatible with legacy LAPS and can use the same local administrator account name and password storage location.
To migrate from legacy LAPS to Windows LAPS, follow these steps:
- Uninstall the legacy LAPS client agent from your devices. You can use Intune or other tools to automate this process.
- Configure and deploy Windows LAPS as described above, using the same local administrator account name and password storage location as legacy LAPS.
- Windows LAPS will detect the existing local administrator password from legacy LAPS, and use it until it expires or is rotated.
Conclusion
Windows LAPS is a great way to secure your local administrator accounts on your Windows devices and prevent common attack vectors that exploit weak or shared passwords. It is easy to set up and use with Intune, and offers many benefits over legacy LAPS, such as native integration with Windows, support for Azure AD, and on-demand remediation actions.
I hope Microsoft will build a feature that automatically create a custom account and add it to admin group. Then that part will be much easier.
I hope you found this blog post helpful, and I encourage you to try out Windows LAPS in your environment. Thanks for reading!